

![]()
![]()
configuration settings
how to find your IP address with win95/98
dialup networking
Windows 95/98:
add client for microsoft networks
add dial-up adapter
install dial-up networking
add TCP/IP
create a new dial-up networking connection
Common Problems and Error Messages:
"could not establish a compatible set of network protocols"
"computer is not receiving a response from the modem"
"password checkbox is greyed (unavailable)"
Windows NT:
finding your IP address
configure dial-up networking
If you need further assistance with technical support, e-mail us your question(s) at: support@networkrichmond.com
Dialer Settings
IP Address: Server assigned (0.0.0.0)
Hostname: Server assigned
Domain name: Leave Blank - This entry is not needed
DNS (primary): Server Assigned
DNS (secondary): Server Assigned
Username: The username you were given
Password: Your NetworkRichmond.Com password
* Ensure that the NetBEUI and IPX/SPX option boxes under the SERVER tab are cleared (see the below example)
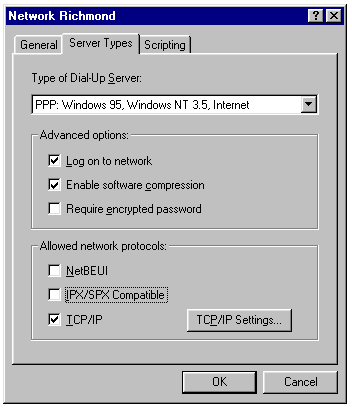
Outgoing
mail (SMTP) Server: mail.networkrichmond.com
Incoming mail (POP3) Server: mail.networkrichmond.com
E-mail Address: yourname@NetworkRichmond.com
Mail
Login Information:
Username: Your NetworkRichmond.Com supplied POP mail username
(do not add @NetworkRichmond.com to the end of the username)
Password: Your NetworkRichmond.Com POP mail password (not necessarily
the same as dial-up password)
Newsgroup (NNTP) Server: news.networkrichmond.com
How to Find Your IP Address with Windows 95
Make sure you are connected to NetworkRichmond.Com before you try the following procedure.
1. Click the Start button and choose Run.
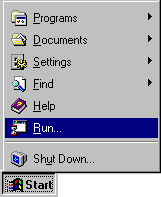
2. In the Open text box, type winipcfg
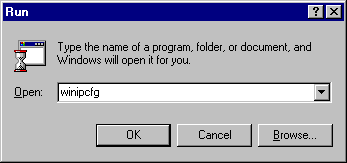
3. Click the OK button.
4.
Your IP Address will be displayed in the IP Address text area.
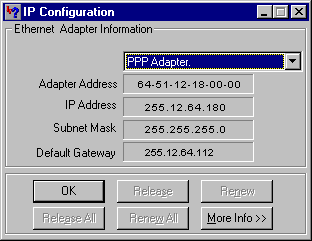
5. Click the OK button to close the IP Configuration window.
Install/Remove:
See the detailed instructions provided within this technical support section if you need further detail. The process should be:
1.
install Client for Microsoft Networks
2. Install a Dial-up Adapter
3. Install Dial-up Networking
4. Install TCP/IP
5. Installing a New Dial-Up Networking Connection
You will need your setup CD, diskettes, or the setup files which may have been put on your hard drive under C:\windows\options\cabs.
Common Problems and Error Messages:
Error:
"Dial-Up Networking could not establish a compatible set of network protocols..."
Normally means that NetBEUI and IPX are checked - check only TCP/IP
Error:
"The computer is not receiving a response from the modem"
Would normally indicate Modem trouble
Save Password Checkbox is "Greyed Out" (Unavailable)
Indicates that user did not log in at the Windows prompt or that Microsoft Networking is not properly installed
Windows 95/98
Add Client for Microsoft Networks
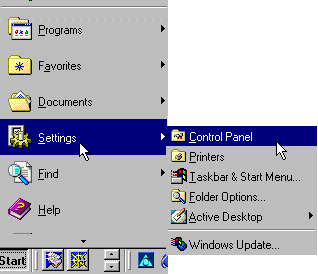
1. Click the Start button point to Settings and choose Control Panel.
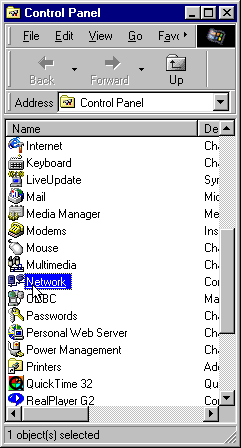
2. Click the Network icon.
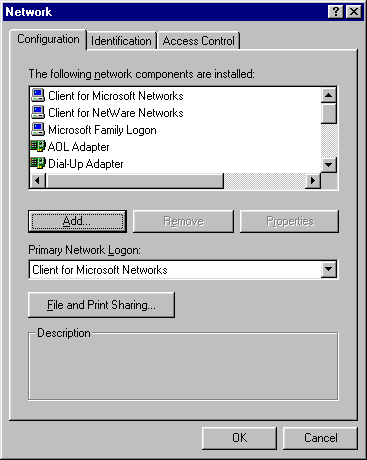
3. Select the Configuration tab.
4. Click the Add button.
5. Select Client.
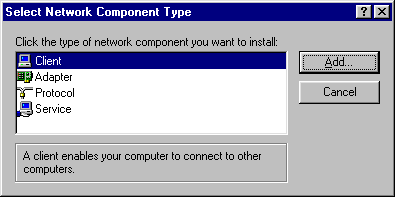
6. Click the Add button.
7. From the Manufacturers: list, select Microsoft.
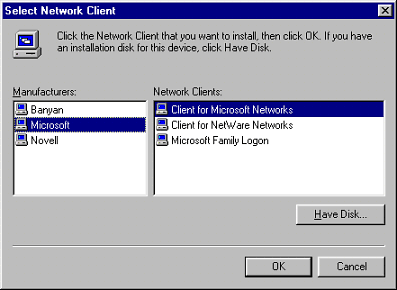
8. From the Network Clients: list, select Client for Microsoft Networks and click on the OK button
9. Windows 95 will prompt you for your installation diskettes or CD. If the installation files have been installed on your hard disk, you may have them in a directory with the path C:\windows\options\cabs. If not, you will need the CD or diskettes.
10.
Several files will be installed. Wait for the Dial-Up Networking installation
to finish.
11. You will be asked if you wish to restart your system to activate the changes, click the OK button when any open files you may be using have been closed to prevent losing any of your work.
12 .If your system does not automatically shut-down and restart, Click on the Start button, choose Shut Down and select Restart the computer.
13. Click the Yes button if asked.
14. Wait for Windows 95/98 to restart.
1.Click the Start button point to Settings and choose Control Panel.
2.
Click the Network icon.
3.
Select the Configuration tab.
4.
Click the Add button.
5. Select Adapter.
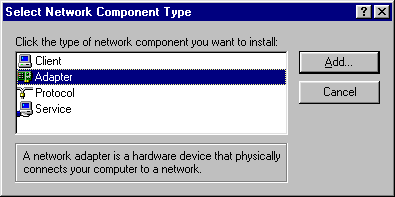
6.
Click the Add button.
7.
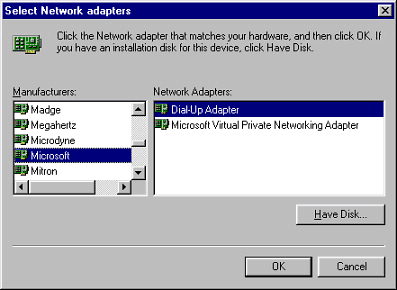
From the Manufactures: list, choose Microsoft.
8. From the Network Adapters: list, choose Dial-up Adapter. Click OK to exit this screen
9. Windows 95 will prompt you for your installation diskettes or CD. If the installation files have been installed on your hard disk, you may have them in a directory with the path C:\windows\options\cabs. If not, you will need the CD or diskettes.
10. Several files will be installed. Wait for the Dial-Up Networking installation to finish.
11. You will be asked if you wish to restart your system to activate the changes, click the OK button when any open files you may be using have been closed to prevent losing any of your work.
12. If your system does not automatically shut-down and restart, Click on the Start button, choose Shut Down and select Restart the computer.
13. Click the Yes button if asked.
hot news | suggestions | contact us | switchboard | search engines | home
Site
Created & Developed by:
Tech Knowledge Inc.
Creative
Technologies


